
You are standing on a driveway with a homeowner watching you, and they want a number. You paced the ground, you eyeballed the pitch from the truck, and now you are doing math in your head that decides whether this job makes money or loses it. Get the squares wrong and you either scare off the deal with a padded number or eat the shortfall out of your own pocket when the crew runs out of bundles at 2pm on a Friday. Measuring a roof is not the glamorous part of the business. It is the part that quietly sets your margin before a single shingle goes on.
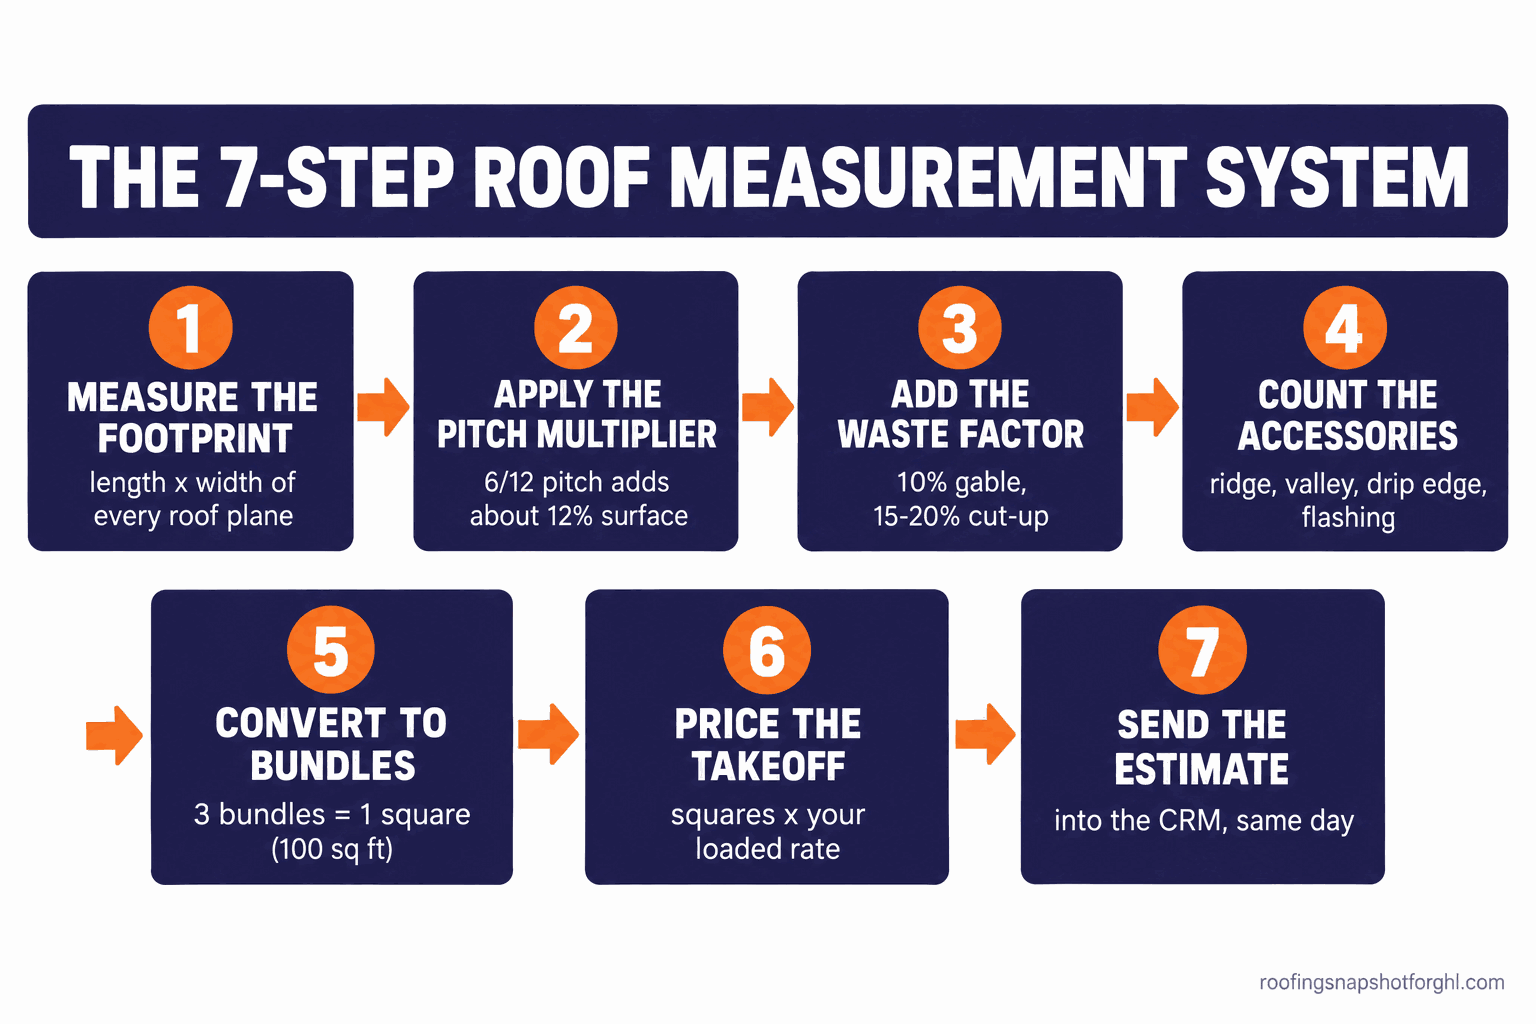
Here is the short answer. You measure a roof in squares by finding the flat footprint of every roof plane, multiplying that by the pitch factor to get the real sloped surface area, adding a waste factor for the roof’s complexity, then dividing by 100 to get squares and by roughly 33 to get bundles. One roofing square is 100 square feet (GAF). The two numbers that trip up most shops are the pitch multiplier, which people skip entirely, and the waste factor, which people guess at. This guide walks the whole path from the footprint to a priced estimate, with the tables you can steal and the exact places the number goes wrong.
Key Takeaways
- One roofing square is 100 square feet. It is the unit your suppliers, manufacturers, and labor all price against (GAF). Get comfortable thinking in squares, not square feet.
- The footprint is not the roof. A sloped roof has more surface than the ground it covers. You multiply the footprint by a pitch factor, and a common 6/12 roof needs about 12 percent more material than the flat measurement suggests (Omni Calculator).
- Waste factor is a decision, not a guess. Roughly 10 percent for a simple gable, 12 to 15 for a hip roof, and 15 to 20 or more for a cut-up roof with valleys and dormers (GAF).
- Three bundles cover one square of standard architectural shingle, about 33 square feet each (Bill Ragan Roofing). Premium and luxury lines can take four.
- The number is worthless if it dies in a measurement app. Steal the tables below, then get the takeoff into the estimate and the pipeline where it turns into a fast quote, not a screenshot on somebody’s phone.
Table of contents
- Why a bad measurement quietly eats your margin
- What a roofing square actually is
- The 7-step measurement-to-estimate system
- Step 1: Measure the footprint, plane by plane
- Step 2: Apply the pitch multiplier
- Step 3: Add the right waste factor
- Step 4: Count the accessories
- Step 5: Convert squares to bundles
- Step 6: Turn the takeoff into a price
- Step 7: Get the number into your estimate and CRM
- Tape, satellite, or app: which method to use
- Steal this: the tables and the takeoff checklist
- Run it for a solo, a mid-size, and a large shop
- Objections
- FAQ
Why a bad measurement quietly eats your margin
Storm work is not slowing down. The United States logged 5,432 large-hail reports in 2025, up from 5,373 in 2024, with up to 80 percent of severe convective storm claims tied to hail (Insurance Information Institute). Every one of those turns into a roof somebody has to measure and price fast, often against three other trucks in the same neighborhood. The average full replacement now runs about $9,608 nationally, from a low near $5,902 to past $46,000 on bigger or steeper homes (Angi). On a job that size, a measurement error of even two squares is real money.
Here is how the money leaks. Measure short and the crew runs out of material mid-job, so you pay for an emergency supplier run while the crew stands around. Measure long and you either padded the price and lost the bid, or you bought bundles that warp in the shop. Roofing runs at $4 to $11 per installed square foot (Angi), so being off by two squares, 200 square feet, is $800 to $2,200 you either ate or overcharged. Do that across a storm season and it is the difference between a good year and a flat one.
The good news is that measuring is a solved problem. It is arithmetic with two adjustments most people skip, and once you run it the same way every time, your numbers stop swinging.
What a roofing square actually is
A square is the unit the whole trade prices in. One roofing square equals 100 square feet of roof surface, or a 10 foot by 10 foot patch (GAF). Your shingle supplier, your underlayment, your labor rate, and your dump fees are all quoted per square, not per square foot, so learning to think in squares is the first step to pricing fast.
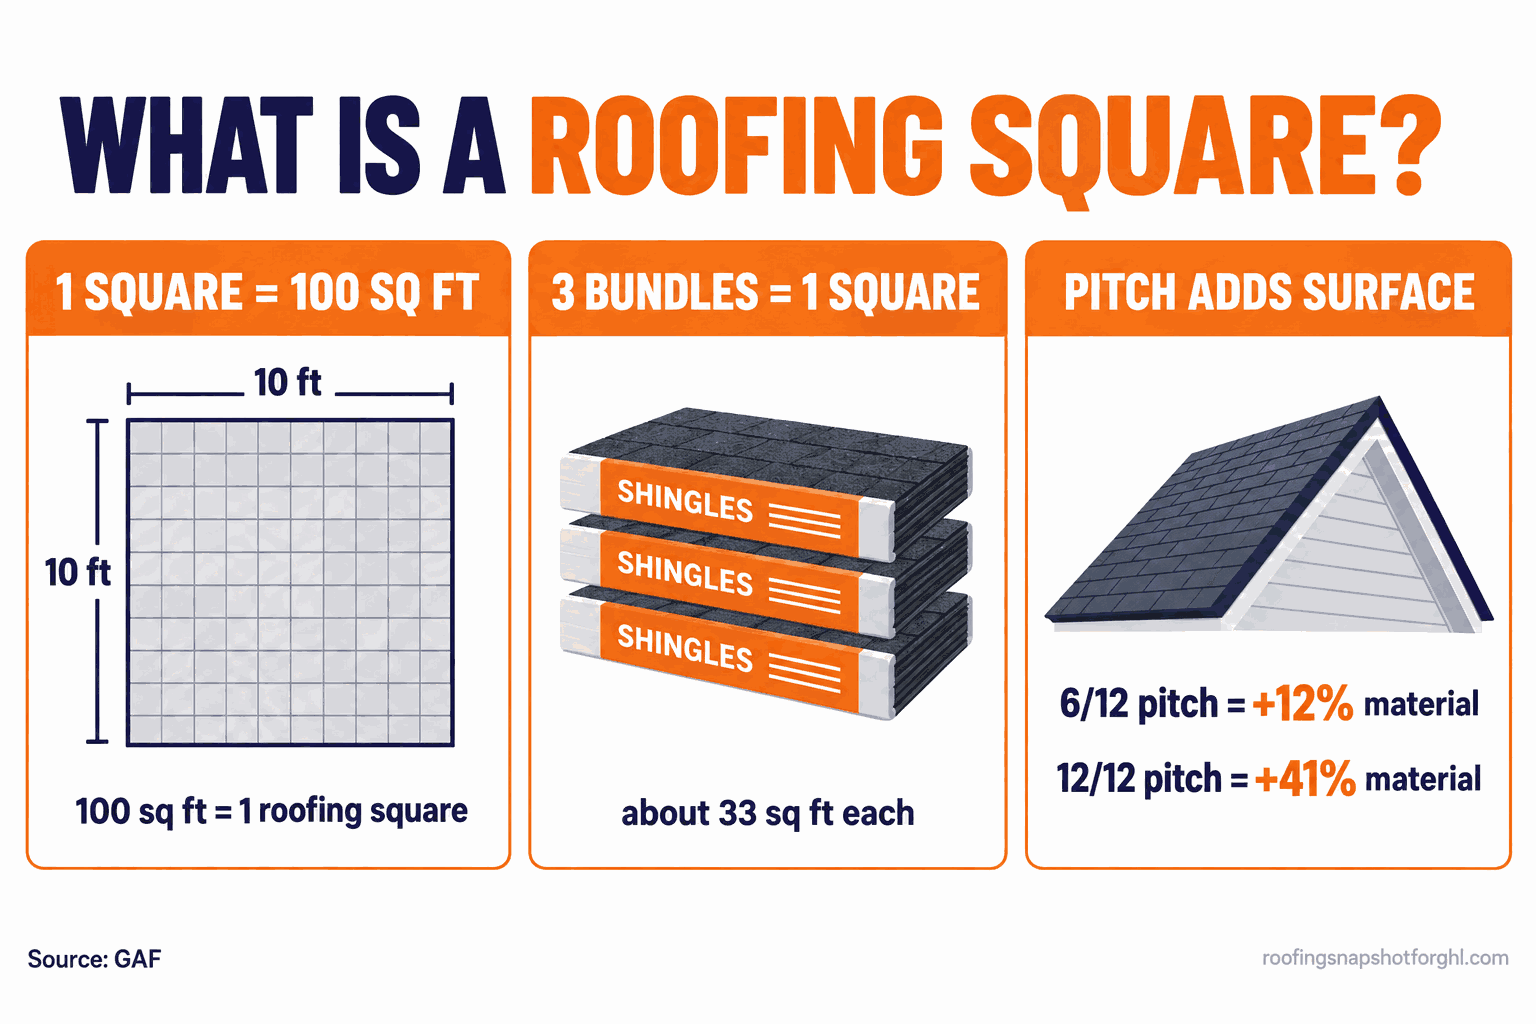
One thing to get straight: a “square” of shingles is the product needed to cover 100 square feet after the overlap, not 100 square feet laid flat. Shingles are installed lapped, so the exposure is built in. That is why three bundles, each covering about 33 square feet, add up to one installed square (Bill Ragan Roofing). You order in squares and bundles, and the coverage is baked in.
The 7-step measurement-to-estimate system
Measuring is not one action, it is a short pipeline, and the number goes wrong at whichever step you skip: footprint, pitch, waste, accessories, bundles, price, then into the system. Miss the pitch and you are short every time. Miss the waste and you are short on the complex roofs, which are the profitable ones. Skip the last step and the good number sits trapped in an app while the homeowner signs with the shop that quoted on the spot. Run all seven the same way and the estimate is defensible, repeatable, and fast.
Step 1: Measure the footprint, plane by plane
Setup. A roof is a set of flat planes. A simple gable has two, a hip has four or more, and a cut-up house with dormers and additions can have a dozen. Measure the length and width of each plane in feet, multiply for that plane’s area, and add the planes together for the total footprint. Sketch the roof, label every plane, and write the two dimensions on each. That sketch is your paper trail if a number is ever questioned.
How it breaks. People measure the house, not the roof, and forget the overhangs, so the footprint comes in short on every side. On a 40 by 30 house, an 18 inch overhang all around adds real area you did not count. The other break is missing a plane entirely, usually a small dormer or a porch, because you rushed the sketch. Slow down on the drawing. Every plane you can see from the ground and the ridge gets a box and two numbers.
Step 2: Apply the pitch multiplier
Setup. This is the step most shortcuts skip, and it is why their numbers come in low. The footprint is the flat ground the roof covers. The roof itself is tilted, so it has more surface than that footprint. You correct for it with a pitch multiplier, also called a slope factor: the footprint times the multiplier equals the actual roof surface. The multiplier comes straight from the pitch, the rise in inches over a 12 inch run, using the square root of the rise squared plus 144, divided by 12 (Omni Calculator). You do not have to remember the formula. You remember the table.
| Roof pitch | Multiplier | Extra material vs footprint |
|---|---|---|
| 4/12 | 1.054 | 5.4% |
| 5/12 | 1.083 | 8.3% |
| 6/12 | 1.118 | 11.8% |
| 7/12 | 1.158 | 15.8% |
| 8/12 | 1.202 | 20.2% |
| 9/12 | 1.250 | 25.0% |
| 10/12 | 1.302 | 30.2% |
| 12/12 | 1.414 | 41.4% |
A 6/12 is the most common residential pitch, and it already adds almost 12 percent. A steep 12/12 adds over 40 percent. So a 2,000 square foot footprint at 6/12 is really 2,236 square feet of roof, and at 10/12 it jumps to 2,604. Skip this step and you underbuy by that whole gap.
Extra material a roof needs above its flat footprint, by pitch. A common 6/12 already adds nearly 12 percent; a steep 12/12 adds more than 40. Source: pitch factor formula via Omni Calculator.
How it breaks. Two ways. First, you skip the multiplier and quote off the footprint, so every steep roof is short. Second, you eyeball the pitch wrong from the driveway. A roof you call 6/12 that is actually 9/12 is off by 13 percent of the whole order. Use a pitch gauge, a level and tape in the attic, or a phone pitch app, and confirm it rather than guessing.
Step 3: Add the right waste factor
Setup. After the pitch correction you have the true roof surface, but you never order exactly that. Cuts at hips, valleys, and rakes create scrap, starter and ridge cap consume material, and you want spare bundles for the odd broken piece and future repairs. That cushion is the waste factor, and it is a decision you make based on how complex the roof is, not a number you pull from the air. The working rule: about 10 percent for a simple gable, 12 to 15 percent for a hip roof, and 15 to 20 percent or more for a cut-up roof with several valleys, dormers, or skylights (GAF).
Typical waste factor by roof complexity. Simple two-plane roofs waste the least; roofs full of valleys, dormers, and hips waste the most because every cut throws away material. Source: GAF.
How it breaks. You use one waste number for every roof. Ten percent is fine on a gable but leaves you short on a house full of valleys, where the cuts alone can burn 15 percent before you count ridge and starter. Slapping 20 percent on a plain gable does the reverse: it pads the price and loses the bid. Match the waste to the roof in front of you, and a quick count of the valleys, hips, and dormers tells you which tier you are in.
Step 4: Count the accessories
Setup. Squares of field shingle are the big number, but the accessories are where estimates get sloppy and margin disappears. Measure and list them separately: ridge and hip in linear feet for cap shingles, valleys in linear feet for valley material, eaves and rakes in linear feet for drip edge and starter, plus counts for pipe boots, step and headwall flashing, and any ridge vent. These are cheap per unit and easy to forget, and forgetting them means either a change order that annoys the homeowner or a hit you swallow.
How it breaks. You quote the field and hand-wave the trim, then buy drip edge, starter, and cap on the fly and never fold their true cost into the price. Ten forgotten accessory lines add up to more than one missed square. Build a standard accessory checklist into your takeoff so the same items get counted on every roof, in the same order, every time.
Step 5: Convert squares to bundles
Setup. Now turn the number into an order. Divide the waste-adjusted surface area by 100 to get squares, then multiply squares by three to get bundles of standard architectural or three-tab shingle, since three bundles cover one square (Bill Ragan Roofing). Premium and luxury lines can run four bundles per square, so confirm the coverage on the specific product before you order. Round bundles up, never down, and add your starter and cap on top as their own line rather than assuming the field bundles cover them.
Worked all the way through: a 2,000 square foot footprint, 6/12 pitch, simple gable. Footprint times 1.118 is 2,236 square feet. Add 10 percent waste, about 2,460 square feet, or 24.6 squares. At three bundles per square that is roughly 74 bundles of field shingle, before starter and cap. Run the same house at 10/12 and the footprint times 1.302 is 2,604, about 28.6 squares with waste, near 86 bundles. Same house, twelve more bundles, purely from pitch. That is why Step 2 is not optional.
How it breaks. You order in squares but forget luxury shingle needs four bundles, so the truck shows up 25 percent short on material. Or you let the field bundles double as starter and cap and come up short on the edges. Keep starter, cap, and field as separate lines on the order.
Step 6: Turn the takeoff into a price
Setup. A takeoff is a materials list. A price is a business decision. Cost every line, materials at your current supplier pricing, labor at your per-square install rate, plus tear-off by the layer, dump fees, permit, and the accessories from Step 4. Then apply your overhead and margin as a deliberate percentage, not a gut feel. Because everything is already in squares, this is fast once you have a rate card. Storm and insurance jobs price the same way, and the itemized version is what holds up when you need to get a supplement approved for the lines a carrier’s first estimate missed.
How it breaks. You price the whole roof as one lump sum with the margin buried inside, so when shingle prices move you have no idea whether you are still making money. Keep the estimate itemized by square and by line. It prices faster, it flexes when costs change, and it gives the homeowner a real breakdown instead of a mystery number, which closes better.
Step 7: Get the number into your estimate and CRM
Setup. This is the step that separates a shop that measures well from a shop that wins jobs. A perfect takeoff that lives as a note in a measuring app and a figure you text to the office arrives at the homeowner slow and disconnected. The measurement should flow straight into a branded estimate and into the lead’s record in your CRM and workflow system, so the quote goes out while you are still in the driveway and the follow-up starts on its own. Whoever gets the clean number in front of the homeowner first usually signs the roof, and speed here is a system, not hustle. That is the same logic behind your whole roofing sales pipeline.
How it breaks. The number lives in three places that do not talk: the measurement app, a spreadsheet, and the office’s head. The estimate goes out the next day, the homeowner already signed, and nobody chased the ones that went quiet. When the measurement, the estimate, and the follow-up sit in one connected system, none of that leaks. The fix for disconnected tools is one place they all feed, which is the point of moving off a stack of apps and onto one connected platform.
Tape, satellite, or app: which method to use
You can get the footprint and pitch three ways, and the right one depends on the job. Tape and pitch gauge cost nothing but time and get you on the roof to spot damage. Aerial reports pull the measurement from imagery without anyone climbing. Phone apps build a model from photos you take on site.
| Method | Cost | Best for | Watch out for |
|---|---|---|---|
| Tape + pitch gauge | Free, your time | Simple roofs, verifying a report | Slow and risky on steep or storm-damaged roofs |
| Aerial report (EagleView) | About $13 to $87 per report | Remote bids, insurance work, carrier acceptance | Per-report cost adds up; verify complex or new-build roofs |
| Photo app (Hover) | Free tier, paid plans around $149/mo | In-person sales, 3D proposals | You have to be on site to shoot it |
Aerial providers report high accuracy, EagleView cites 95 to 98 percent on standard residential roofs and wide carrier acceptance (Roofing Software Guide), which is why they dominate insurance work where nobody has been on the roof yet. Photo tools like Hover build a 3D model from smartphone photos and shine in a face-to-face sales flow (Roofing Software Guide). The category runs roughly $9 to $87 per report depending on method, so if you pull reports daily, that cost is a real line worth tracking against your other software spend.
Steal this: the tables and the takeoff checklist
Two of these you already have above, the pitch multiplier table and the waste-factor tiers. Print them. Here is the rest of the takeoff, the part that keeps every estimate consistent no matter who runs it.
That estimate-in-the-driveway moment is the whole point of measuring well and fast. The number is only worth what it earns, and it earns nothing until it is in front of the buyer.
Run it for a solo, a mid-size, and a large shop
The seven steps do not change with your size. What changes is how you measure and how much you automate the last two steps.
Solo operator. You are the estimator and the closer. A tape and a pitch gauge cost nothing, and you are already on the roof looking for damage, so measure it yourself on simple jobs. Pull an aerial report only when the roof is too steep or storm-torn to walk safely, and price it per report rather than a subscription. Your real risk is Step 7: you cannot build a pretty estimate while balancing on a ladder, so use a mobile estimate template that turns your squares into a sendable quote in a couple of taps.
Mid-size, three to five crews. Now the problem is consistency. Two estimators measure the same roof and come back with different squares because one skips the pitch and the other guesses waste. Standardize the takeoff, one checklist, one waste-factor rule, one rate card, so every quote is built the same way. This is the size where feeding the measurement straight into the CRM pays for itself, because the estimate goes out same-day and the follow-up runs without anyone remembering to do it.
Large shop with a sales team and a measuring department. You have volume, so your leak is speed and visibility. Reps wait on measurements, measurements wait on data entry, and hot leads cool while the quote sits in a queue. You want aerial reports flowing automatically into a templated estimate and every quote logged on the board with a status, so nothing stalls silently. At this size the highest-ROI move is a connected system, or a custom estimating workflow, that kills the handoffs between measure, price, and follow-up.
Solo shops win by quoting accurately on the spot, mid-size shops win by making every estimate consistent, and large shops win by killing the delay between measure and quote. Same seven steps, different pressure point.
Objections
“I’ve measured roofs for twenty years, I don’t need a table.” Then you already run these steps in your head, and the table just makes them repeatable for the next person you hire. The problem is not you on a simple gable. It is a new estimator on a cut-up hip roof who skips the pitch and quotes you into a loss. Writing the system down is how your numbers stay yours when someone else does the measuring.
“Can’t I just use EagleView and skip all this?” An aerial report gives you the footprint, pitch, and areas, and it is excellent for that. But you still choose the waste factor, count the accessories, apply your rate card, and get the quote out fast. The report does Steps 1 and 2. You still own 3 through 7, and 7 is where the job is won.
“Satellite reports are accurate enough, why walk the roof?” For remote bids and insurance work they usually are, with EagleView citing 95 to 98 percent accuracy (Roofing Software Guide). But a new build, a recent addition, or a heavy tree canopy can throw the imagery off, and on storm work you want eyes on the actual damage anyway. Trust the report on standard roofs, verify it on odd ones.
“Adding a waste factor just pads my price and loses bids.” Only if you use the same padded number on every roof. A right-sized waste factor, 10 on a gable and 18 on a valley-heavy roof, prices you correctly, not high. The shop that loses bids is the one that puts 20 percent on everything, and the shop that loses money is the one that puts 10 on everything. Matching waste to the roof is how you do neither.
“Do I really need this in a CRM? A spreadsheet works.” A spreadsheet holds the number. It does not send the estimate, start the follow-up, or tell you which quotes went quiet. The measurement is one input to a pipeline that has to move fast to win, and that is the difference between a takeoff and a signed roof.
Frequently asked questions about measuring a roof
How many square feet are in a roofing square?
One roofing square equals 100 square feet of roof surface, a 10 foot by 10 foot area. Suppliers, manufacturers, and labor all price per square rather than per square foot, so measurements are converted into squares before ordering or quoting.
How do I measure a roof in squares?
Measure the length and width of each roof plane in feet and multiply for its area, add the planes together for the footprint, multiply the footprint by the pitch factor to get the true sloped surface, add a waste factor for complexity, then divide by 100 to get squares. Three bundles of standard architectural shingle cover one square.
What is a roof pitch multiplier and why does it matter?
A pitch multiplier, or slope factor, converts a flat footprint into the actual sloped roof surface, which is always larger. A common 6/12 roof has a multiplier of 1.118, meaning about 12 percent more material than the footprint suggests, and a steep 12/12 needs over 40 percent more. Skipping it is the most common reason estimates come in short.
How much waste factor should I add when measuring a roof?
Roughly 10 percent for a simple gable roof, 12 to 15 percent for a hip roof, and 15 to 20 percent or more for a complex cut-up roof with multiple valleys, dormers, or skylights. Match the waste factor to the roof's complexity rather than using one number for every job.
How many bundles of shingles are in a square?
Three bundles cover one roofing square for most standard architectural and three-tab shingles, with each bundle covering about 33 square feet. Premium and luxury shingle lines can require four bundles per square, so confirm the coverage on the specific product before ordering.
Is an EagleView report accurate enough to skip climbing the roof?
For standard residential roofs, remote bids, and insurance work, aerial reports are highly accurate, with EagleView citing 95 to 98 percent accuracy and wide carrier acceptance. Verify the report in person on new builds, recent additions, or roofs with heavy tree cover, and on storm jobs walk it to inspect the actual damage.
Back on the driveway
Go back to the homeowner waiting for a number. Under this system you are not doing anxious math in your head. You measured the planes, applied the pitch multiplier off the table, chose a waste factor that fits the roof, counted the accessories, and the estimate is priced and heading to their phone before you are off the property. The number is defensible, repeatable by anyone you hire, and it went out fast enough to beat the next truck. Measuring a roof is arithmetic. Turning that measurement into a signed job, on the spot, is a system, and you do not have to build it from scratch.